- Home
- About Us
- Products
- Rohmann Eddy Current
- Secu-Chek UV-LED Lamps
- Sonatest
- MR Chemie
- NOVO DR
- Hoffmann Tam Panels
- Desoutter Industrial Tools
- Novotest
- Integrated Design Tools (IDT Vision)
- Dakota NDT
- DeFelsko Corporation
- AVIONICS
- Sonotec Ultrasonic Solutions
- Sonotec Ultrasonic Hand-Tools
- G.A.L. Gage Company
- Western Instruments Inc.
- Esders Gas Technology
- Yoancomposite
- Hinode Electric
- Services
- News
- Contact Us
 (65) 6878 0608  (65) 6878 0609 |

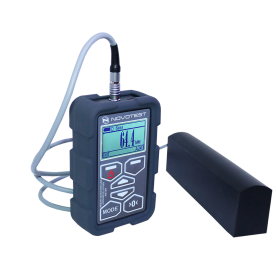
CONCRETE COVER METER NOVOTEST REBAR DETECTOR (NEW GENERATION 2020)
Concrete Cover Meter NOVOTEST Rebar Detector is used to measure the thickness of the concrete cover, determine the location and estimate the diameter of rebar in reinforced concrete products in the conditions of enterprises, construction sites, buildings and structures in use.
The main advantages and tasks that the Concrete Cover Meter NOVOTEST Rebar Detector solves:
MEASURING THE THICKNESS OF THE CONCRETE COVER
Measuring the concrete cover of reinforced concrete structures is the main task of the Concrete Cover Meter NOVOTEST Rebar Detector. Depending on the diameter of the rebars, the device allows user to measure the thickness of concrete with a specified accuracy of up to 170 mm.
SCANING OF TESTED OBJECT
With a special mode, the user can scan an object for the presence of an rebar and its position. If necessary, the operator can use the audible signaling of the rebar presence, which eliminates the need for constant monitoring of the device display.
ASSESSMENT OF THE REBAR DIAMETER
The device has a special mode for assessing the diameter of the rebar, it is calculated during operations according to a special method during which the minimum distance to the rebar with and without a plate with a known thickness is measured, and the device calculates the expected diameter of the rebar using the correlation method.
DESIGN
The device is assembled in an ergonomic shock-resistant case, which allows it to be used in rather extreme conditions.
Advantages:
As a result of the modernization, the Concrete Cover Meter NOVOTEST Rebar Detector, in comparison with the previous generation, got:
- dust, moisture and shockproof housing for industrial use in harsh environments
- large contrast display
- the ability to adjust the brightness and contrast of the display, the choice of language, the choice of units of measurement (mm or inches)
- universal probe with built-in memory and stored calibration tables
- possibility of saving a backup copy of calibrations in the device
- increased accuracy and stable measurementsThe cost of the device remained unchanged. Thus, you get a device with extended functional and operational characteristics at no additional cost.
| specifications | |
| Range of measuring the thickness of the protective layer, mm | 5 … 170 |
| Controlled diameters, mm | 6-50 |
| Measurement accuracy, mm | (0.03 h + 0.5) |
| Standards | BS 1881, Part 204 DIN 1045 SN 505262 SS 78-B4 |
| Overall dimensions, mm | 122х76х36.5 |
| Operating temperature, ° C | -20 … +40 ° C |
| Power supply | 2pcs AA batteries |
| Time of continuous work hours, not less | 8 |
| Weight of electronic unit with batteries, no more, kg | 0.2 |


